Archive for the ‘Time Lapse Video Throwie’ Category

Findings

Monday, April 9th, 2012

I have a version of the circuit that uses the LED signal to stay in sync. However I was thinking about my earlier statement that the timing was off and that’s why the system stops taking pictures after a while.

Wrong.

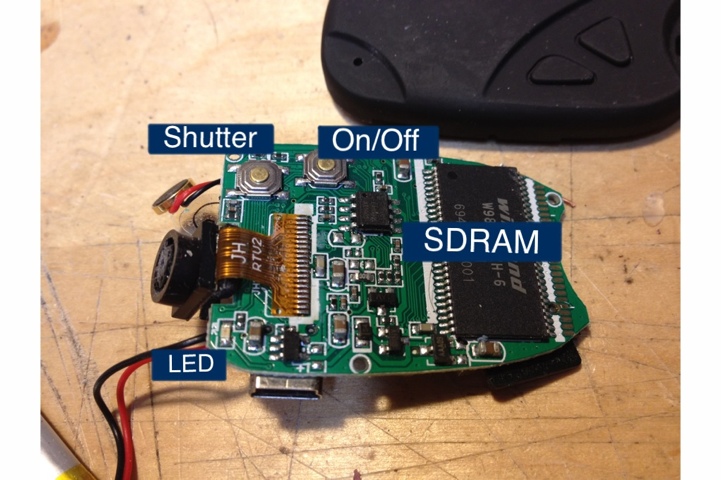
I noticed that after 30 or so pictures that the LED was taking longer and longer to go out (signalling image acquisition) after I sent the shutter signal. I think that what’s happening is the system is iterating through the existing files on the SD card to find the next filename to use, and as the files accumulate this takes longer. I’m going to explore this a little further but right now this would mean that any animation would slowly speed up!
[edit] maybe use a better card

The other thing I found came from the design of the testbed. I had a power switch handling the ATTiny and the camera circuit and I found that not all pictures were being stored. Additionally when I mounted the SD card onto my computer it would complain that the card had been improperly ejected.

I believe that the circuit is writing data to the memory card even after you’ve hit the power button and of course pulling the power at that point would leave the card in an indeterminate state.

First Light

Saturday, March 31st, 2012

It’s hard to tell from the picture but the LED is on and this is mostly working. I say mostly because this is strictly a timed sequence and sometimes the unit can take a varying time to take a picture. This can be enough to throw off the timing and the unit ends up staying on most of the time and not taking any pictures. The solution to this is to monitor the LED status, so thats the next job.


Here’s the code:

while (1)
{
// Power On
PORTB |= _BV(3);
delayMs(100, 20); // 100ms * 20 times = 2s
PORTB &= ~_BV(3);

// Shutter
delayMs(100, 10); // 100 ms * 10 times = 1s
PORTB |= _BV(4);
delayMs(100, 1); // 100ms * 1 times = 100ms
PORTB &= ~_BV(4);

// Power Off
PORTB |= _BV(3);
delayMs(100, 20); // 100 ms * 20 times = 2s
PORTB &= ~_BV(3);

delayMs(150, 100); // 150ms * 100 times = 15s
}

Hello World

Wednesday, March 28th, 2012

A short program running on the Atmel to verify operation

20120328-223236.jpg

Programming

Wednesday, March 28th, 2012

Here is the Attiny45 hooked up to the header which will connect to my programmer. Below that is the programmer itself. The perfboard integrates the AVR ISP and a USB-to-serial converter into a single header which I use for my ATMega169 development. This project is trivial enough that I can use my scope for troubleshooting.

20120328-221730.jpg
20120328-221721.jpg

Test Measurements

Saturday, March 24th, 2012

Test Point Off On Shutter Pressed
A 0v 3.3v 3.3v
B 0v 1.4v 3.3v pulse
C 0v 0v 3.3v
D 0v 3.3v 3.3v
E 0v 0v 3.3v
F 0v 3.3v 3.3v
G 0v 0.5v 0.5v
H Vcc Vcc Vcc
I 0v 0.6v 0.6v
J Vcc Vcc Vcc

Test Jig

Thursday, March 22nd, 2012

Here is the DVR hooked into the test jig. I’ve tapped into the connections on the shutter and power buttons, and the LED. These will give me everything I need to figure out how to do the interface.

20120323-232043.jpg

Throwie Guts

Tuesday, March 20th, 2012

Here’s a look inside. It’s pretty basic. When you press the power button the LED glows dimly then brightly, and then it stays on. If you press the shutter button at this point then the LED goes out briefly and you have taken a picture. If you hold the shutter button down then the LED shuts off and you are recording video. I think this is quite a clever way to use a single LED.
Anyway the plan is to run the Atmel directly from the battery and intercept the on/off button press to wake from sleep. Then wake the rest of the module, wait for the LED to turn fully on and take a picture. Then power off the module, sleep for 30 seconds and do it again.

20120320-211147.jpg

20120320-211157.jpg

Time Lapse Video Throwie

Saturday, March 17th, 2012

20120317-215250.jpg

“What’s This?” you ask. It’s a keychain video recorder. Search for “keychain video dvr” on Ebay to see what they can do and how incredibly cheap they are.

“What’s a throwie?” you ask next. You can see here for the details but it’s basically a LED, battery and magnet that you can throw at something metallic and have it stick there and entertain until the battery runs out.

So a Time Lapse Video Throwie is a combination of the two. The unit is small enough that it can be attached to a rare earth magnet and left somewhere for a few days and take pictures every 30 seconds or so. Now, this unit does not do that currently; it can record about 30 minutes of (so-called) HD video or take several thousand photographs. My modification will be to install an Atmel ATTiny45 microcontroller (as used in the Blink Project to wake up the device and take a picture every 30 seconds.

The memory (4GB Micro SD) runs out before the battery does so I think I’ll be able to leave this somewhere for a few days at a time.